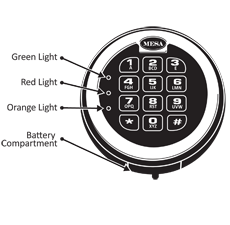
Safes with this Lock:
- Mesa MSC1916E High Security Safe
- Mesa MSC2120E High Security Safe
- Mesa MSC2520E High Security Safe
- Mesa MSC3820E High Security Safe

IMPORTANT:
- To ensure the safety of your belongings, you MUST change the factory set User Codes to your own unique codes immediately!
FEATURES:
Two Code Capacity
- User 1 Code: Factory Set
- User 2 Code: Factory Set
Lock-Out Penalty
- Five Beeps Lockout Penalty
- If three invalid codes are entered in a row, the keypad will shut down for a period of fifteen (15) minutes.
- During this shut down period the keypad will not accept any codes.
Two User Codes
- Two User Codes can be programmed up to eight (8) digits long.
- Please change both codes immediately for your safety.
OPERATING INSTRUCTIONS:
Always Perform this operation with the door open
- Before closing the door, make sure all the changes are correct.

Quick Start
- Install a 9-Volt Battery
- Enter: [factory set Code x - x - x - x - x - x - x - x - #]
Green light will turn on.
- Turn handle before the green light turns off
- To lock your safe, close door & turn handle back to the locked position
IMPORTANT:
- Always make sure your safe is locked before walking away!
- If your code is correct a green light will turn on for approximately 5 seconds & you will hear a 'Click'
- If the code is in incorrect a red light will turn on, followed by 5 'Beeps'
NOTE:
- Be sure to press firmly & ONLY use your finger tips to press the keys on the keypad. DO NOT USE your finger nail, a pen, etc. This will damage the keys
Safe Operation & Programming
-
1st USER CODE is factory set : [factory User Code 1: x - x - x - x - x - x - x - x - #]
-
2nd USER CODE is factory set : [factory User Code 2: x - x - x - #]
Please see your user manual for the factory set User Codes or contact Tech Support.
IMPORTANT:
- To ensure the safety of your belongings, you MUST change the factory set User Codes to your own unique codes immediately!
How To Open Your Safe
- Input : Code-# [light stays green for 5 seconds]
- Turn handle to the unlocked position before the green light disappears
Example: 1-2-3-#
Invalid Code: 5 'Beeps'
Wrong Try Penalty
- If 3 wrong codes are entered consecutively, the keypad will shut down for a period of 15 minutes. During this shut down period, the keypad will not accept any codes
Changing the 1st User Code
- Locate the red button on the inside hinge side edge of door
- Press the red button [Lock will 'Beep' 2 times with the yellow light on]
- Input: Your New Code-* [Lock will 'Beep' 2 times]
Unsuccessful Code Change: 5 'Beeps' [the old code is still valid; repeat steps 1-3]
NOTE:
- Test the new codes several times before closing the door.
Changing the 2nd User Code
- Locate the red button on the inside hinge side edge of door
- Input: 0-0 on the keypad & Press the red button [Lock will 'Beep' 2 times with the yellow light on]
- Input: Your New Code-* [Lock will 'Beep' 2 times]
Unsuccessful Code Change: 5 'Beeps' [the old code is still valid; repeat steps 1-3]
NOTE:
- Test the new codes several times before closing the door.

Low Battery Warning
- Red light appears when you open the safe other than the green light.
- Enter your code and get valid response but the lock doesn't unlock.
Changing the Batteries
- Locate the battery cover on the bottom edge of the keypad and remove the cover by pulling on the tab.
- Carefully and gently remove the 9-volt battery from the compartment.
CAUTION! Hold onto battery connector to avoid pulling wires out of housing.
- Carefully reinsert the new 9V alkaline battery, do not force the battery into the compartment.
- The lock will retain all current codes and settings
Downloads:


